In the last part of the previous tutorial you already used some git commands like clone and push. Most of the git commands are pretty straightforward and do exactly as the name says, even though, I will still explain briefly what the command is used for and how to use it.
Commit:
The Commit command will open the staging window, in which you can select all of the files you want to commit to your local branch (more on branching below). For now remember that this will not affect the remote repository but only save the changes to your local working space. Committing your changes is necessary if you want to switch branches. A commit is also good to just save your temporary changes to the code to come back working on it later.
Push:
This command will upload your committed work to the remote repository. Usually done in combination as "Commit & Push" from the previous tutorial.
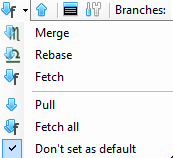
Pull:
The pull command will open a pull dialog in which you can select some options:

In the example above we want to checkout the remote branch 'master' to our local branch 'master'. We also specify that we only want to fetch the remote changes and not merge or rebase anything, since it is the same branch.
Fetch
The Fetch command can be found in the pull drop-down menu:
It will update all pointers to existing branches from the remote repository. For example: someone else made a change to the master branch and committed to the remote master branch. If you press the fetch command, it will set the pointer from the origin/master branch to a new version shown below:
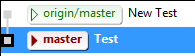
This says your local copy of the repository is still on the "out-dated" version of this branch on "Test", while there is a new commit already pushed to the origin/master branch shown above it as "New Test".
To retrieve the changes made in this commit you will have to checkout this branch shown below. You could also pull all changes in this branch by rebasing the origin/master in your local repository, the results will be the same (in this case).
Branches:
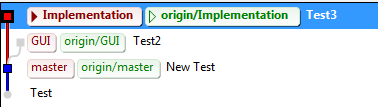
Branches are what makes Git really useful to work with. For this tutorial we will assume we have two teams working on a piece of software: the first one will focus on the implementation part of the code and the second team is creating a GUI for it. To realise this in Git we can create two branches in our project by using the command "Create Branch" to create "Implementation" and "GUI" branches. The result so far will be shown as follows:

The GUI and Implementation branches are on the same commit as the master and origin/master branches. We will now change our current branch to the GUI branch, apply some minor changes, then commit and push them to the remote repository. When it asks if you want to add this branch to the remote repository, click yes.
Now checkout the Implementation branch and you will see that the changes you have just made to your GUI branch are undone! Talking in SVN terms: you have just created two "seperate" repositories next to each other, one called Implementation and one called GUI.
To continue with the next part of the tutorial, make some minor changes to the Implementation branch as well and commit and push it as you did before. The result will look something like this (you might have to click View -> Show all branches first):
Merging:
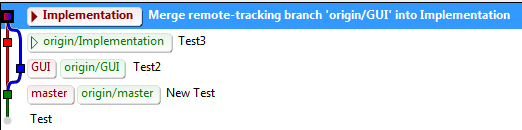
In our example from branches, the GUI team has reached a point where they made a few buttons. The Implementation team wants to have these buttons in their Implementation branch, how do we do this?
Change to your Implementation branch, and choose Command->Merge branches (or Ctrl + M). You will see the following window pop up:

As you can see you're currently in the Implementation branch and you want to merge it with the origin/GUI branch (where the other team has pushed their changes). Shown in the example to the left you can see what will happen, the C and D nodes represent changes to your current branch (we have one, called "Test3"). The E and F nodes represent changes the GUI branch, in our example shown as "Test2". This merge will combine these changes to your local branch of Implementation. If you don't run into any conflicts (e.g. you haven't changed anything on the same line in any file) it will merge automatically and the Implementation team will have their fancy buttons. If however you did change the same line in a file, you will run into a conflict.
File conflicts:
We tried to merge two branches and Oops! We got a file conflict! Click "Resolve conflicts" to get to this next window:

As you can see, there is a conflict in the .gitignore file. File conflicts are solvable withing Git Extensions (actually they are solved by KDiff3). Click on the "Open in kdiff3" button to get this next screen:

You can see you have 3 files, shown with red underlines they are your Base file, Local file (from your local branch, Implementation) and the Remote file (the file from the GUI branch). You can see that there are different versions in both branches. The output will be the bottom most screen. To solve the conflict you can press the blue A, B and C buttons on top or even manually type it in the bottom code if you want a little bit of both. If you have multiple conflicts you can click on the arrow buttons to automatically scroll to the next conflict to solve. If you are done solving conflicts, save your changes and close this screen.
You will now be asked if you want to commit and push these newly made changes from the conflicts, press commit. After you've done that you successfully merged the GUI branch in our Implementation branch, with the result showing up as follows:
After doing this you can still use your GUI branch to continue working on the GUI. The Implementation branch will have the changes made in the GUI branch from the time of the merge. Even though this example was good to illustrate merging, I'd advise against it and instead merge your changes from both Implementation and GUI branches to the master branch (if it all compiles of course!).
These were the basics of working with Git in the Git Extensions GUI, you can leave any questions or comments below.
No comments:
Post a Comment